Dairy Free Croissants (a Weekend Project)
Who says you can't make quintessential French pastry typically loaded with butter- dairy free? Let's show up the naysayers by making some intoxicatingly delicious and enticingly gorgeous croissants that no one will believe are dairy free, but they can be!
Method
Recipe source: https://food52.com/recipes/82690-vegan-croissants-recipe
Dairy-free substitutions:
Butter: Because of the general ability to substitute 1:1 with butter, I used Imperial brand margarine. It's also affordable because you will use a lot of it. This recipe highlights other brands, but I have consistently used Imperial.
Milk: I happened to have Ripple plant based milk on hand.
Procedures: Note that this is going to take a few days. Each of the rest periods is a few hours. You could squeeze it into 2 days but I typically spread it out over 3 days, which I'll describe here.
Day 1: Make your dough (bonus: prepare your "butter" pad)
The dough begins with yeast, flour, some butter, and a bit of salt and sugar. Beat that up, add the "milk," and beat into a smooth dough. Wrap it up and let it rest.
Bonus: On Day 1, I like to also prepare my butter pad. I found it quite easy to measure out the margarine, which I did by cutting it into thin slabs and weighing it. Then, I was able to place it down between two sheets of plastic wrap and pound it together to a smooth-ish square using my rolling pin. 


Day 2: The next day, I find my dough quite poofy in its plastic wrap, just waiting to be released.
Now, we will begin our laminations. This is a series of folds to encase the butter pad into the dough to create LAYERS. First, wrap your dough around the the butter pad to fully enclose it. Fully enclosing it is absolutely essential so that butter does not seep out during baking. 


Next, roll it out gently. This part requires patience, because it's still cold from the fridge so it wants to retract. You don't want to rush or force it along, because you don't want to cause any tears in the dough and expose any of the butter inside. I'm surprisingly not a perfectionist when it comes to getting the recommended measurements exactly. This is mostly by trial and error- I found it difficult to obtain, and then I found it didn't matter because the results were still delicious. Once rolled out, fold it back up in thirds and let it rest for 20 minutes.
After 20 minutes, you'll repeat this process two more times. Roll out your folded dough, then refold. Then rest, roll, and fold one more time. You'll note I did get some tearing in my dough- despite my efforts I always fall far short of perfect. But I wanted to show you honestly because I think the results were still impressive. Still, the better you can enclose your butter, the flakier and more tender your croissants will be.
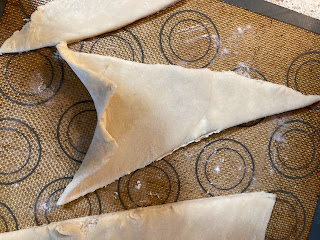
On Day 3, we finally get to bake our croissants. First, we must shape them. This time, we roll out our dough even longer. Then, we cut them first in parallelograms, then triangles. Who knew that I'd use both fractions and geometry when baking? I'm so glad I passed the 5th grade. Then make a little notch at the base, and roll, curving slightly out as you go.
Then, we have to patiently let them rest while they proof. Here, I let them proof for an hour and a half but I wish I had let them go for a full 2 hours, because they were just starting to get puffy. Turn the oven on half an hour before you start to bake. Right before you put them in, give them a little egg wash.
Speechless.
Ok I have two words- FLAKY LAYERS!!!
Discussion
Ok I have more words- flaky, tender, buttery croissants are definitely within reach for you even if you live without dairy or feed others who do not consume dairy.
Now that I have completed this recipe a few times, I am curious what different variables like longer proofing, being even more cautious about tearing, and higher or lower oven temperature would do for the results. I would also love to experiment by trying more fillings (I did chocolate one time).
Overall, I highly recommend using this recipe because it is designed to be used with vegan butters, and I can attest to the results. But please don't let this limit you!
Follow Up Study: Can You Freeze Croissants?
Some bakers may be interested in having croissants on demand, or being able to save some of their hard work for another day.
Hypothesis: Can they be frozen, and baked at a later date?
Method: Following tips from online, I froze some of the croissants once they had been shaped. First, I froze them until solid on a baking tray, then enclosed them in a freezer bag. Then, the night before I wanted to bake them, I placed them on a plate (covered) to defrost. The next morning, I took them out of the fridge to rise for 2 hours, then gave them an egg wash and bake.
Results:
They were gone in one brunch for 2 people.
Discussion: I think I baked them for 1-2 minutes longer after this to get them more golden. They were still delightful, flaky, and delicious, so I was overall impressed. They did not rise quite as much, though. Therefore, I still believe fresh is best for taste and texture, but freezing can greatly aid in accessibility of croissants, which is also a good thing.


